

Happy St. Patrick's Day!

image from commons.wikimedia.org
This manicure was inspired by the three leaf clover - the shamrock! As the story goes, St. Patrick used the shamrock to explain the Trinity to the Irish when converting them to Christianity. That's why I thought it would make a great St. Patrick day manicure!

For this manicure both Nubar Reclaim and NARS Zulu were used.


For Step 1, begin with two coats of Nubar Reclaim, followed by a quick dry top coat.


Step 2 is where the blue tape comes in! Cut a piece of blue painter's tape about 1/2 to 1 inch in length. First fold the strip of painter's tape in half. Without letting the ends of the tape stick together, fold the tape the opposite way (with the sticky sides on the outside) so the tape strip is now a fourth as wide as it was to begin with. (To get a better idea of this concept, refer to the above image.)
Once you have the tape folded together, using a permanent marker, draw half a heart onto the folded edge of the tape (as seen above). Cut out the heart following the drawn line, using the sticky (open) sides to help manuver the piece of tape while cutting out the heart.
Then slowly peel open the strip of tape, and you have a whole heart! You will need to repeat this process three times to make a complete shamrock for one nail (and thirty hearts if you want to do all ten nails).


Using the heart you have just cut out, use the folded line that goes through the center of the heart to line up the heart in the center of your nail. Make sure your piece of tape is pressed down firmly and paint Zulu both forwards and then backwards across the open heart (to make sure all of the open space is filled in).


Now using the second heart you cut, cut along the right side of the heart leaving a sliver of tape between the heart and the edge of the tape (so any excess nail polish you paint inside the heart that spills over will not paint onto the nail). This diagonal will also help you line up the second heart where you can make sure the point of the second heart is just below the point of the first heart.
Also remember to try not to put the second strip of tape over the first heart you painted because if you are painting one heart right after the other, the first heart will not yet be dry.


Step 5 will be the last heart to add. For this step, follow the same idea of Step 4, where you will cut along the diagonal following the side of the heart, but this time you will be cutting along the left side. Try to not only line up the bottom tip of the heart below the tip/point of the first heart, but also try to line up the third heart as a mirror opposite of the second heart.


For Step 6, you will need a pair of nail clippers! (I recommend using toenail clippers.) Cut three (straight) strips of tape where one is wider and longer than the other two. Taking the wider strip of tape, cut once along the length of the piece of tape (in the center of the strip) using your nail clippers, so you create a curved slit in the direct center of the strip of tape. Either below or above the center slit you have created, cut another line with your nail clippers (following the same curved direction) so you have two curved slits. Using scissors, cut the dividing sliver of tape between the two slits off at the end and beginning of both slits so as to create a curved line that you will then fill in with nail polish.
Place the piece of tape with the curved line-gap where the start of the gap is just below the three points of the hearts in roughly the middle of your nails. Use the other two strips of tape to mark off the length of the gap you are going to fill in, considering the fact that this painted gap will be the stem of the shamrock.
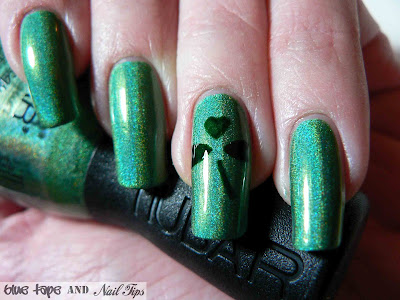
And now you're done! Just paint with top coat to seal the shamrock once the design is dry! The above picture is your final look - a shimmering shamrock for one (or all) of your nails!
So what do you think of this nail design? Will you try it?
On another note, you can follow Steps 2 and 3 to create simple hearts to spice up any manicure if you don't have access to a Konad (or other brand) stamping kit. This also works great if you want to use a sheer polish (like Zulu) to create a heart-studded manicure, since those polishes that are more jelly-like in quality tend to not transfer well when stamping.
Thanks for stopping by! I hope you enjoyed this post! (And a sincere thank you to all the new followers who have joined, and those that have stuck around!)
Cute!
ReplyDeleteThanks!
DeleteSuch a beautiful green!
ReplyDeleteI agree!
Deletegorgeous green, i love the tutorial
ReplyDeleteOh, thank you! (I love the green too!)
DeleteThanks for the comment!
ReplyDeleteThis manicure would have worked perfectly with the hearts punch I bought around Valentine's day. It was four hearts in a clover arrangement. You could have punched the tape and painted your three leaf clover with one piece of tape!
ReplyDeleteThis is still brilliant, and the end result is cute as can be!
Reclaim is so beautiful I wanna cry! And the mani is so cute :)
ReplyDelete